First of all, it is important to explain why earbuds & headphones need to be cleaned. If you use headphones and earbuds daily, you need to clean them once a week. The earbud has a metal or cloth mesh attached to the front of the speaker. When we use it, dirt and dust stuck inside the ear stick to its mesh, and the grille is clogged. This incident also happened with my earbuds. People think that the speakers are damaged; most of the time it doesn’t happen. The reason is the mesh being blocked. In such a case, I will fully inform you about the precautions and things you need to do going forward, what you need to do, and what you shouldn’t do.
How to clean earbuds
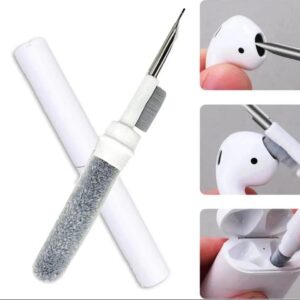
Tools
There is also a special tool kit for cleaning. If you want, buy it. Otherwise, you must have these things with you.
- Soft Bristle Brush
- Microfiber Cloth
- 70% Isopropyl Alcohol (IPA)
- Wooden Toothpick
- Plastic Cleaning Pick
- Blade
- Double type
I had been using my earbuds for a long time, and the sound of my right earbud was slowly fading. I didn’t notice this so much at first because I was using both earbuds. One day when I was using it alone, I realized that its sound had become quite muffled. When I examined it, I found that its mesh was almost closed due to dirt, and there were a few holes that were open.
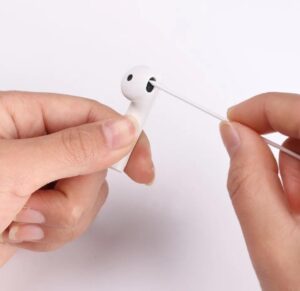
It was the right earbud; the left earbud was perfectly fine. Then I turn off my earbuds and remove the silicone tip. If your earbuds have silicone tips, remove them. Then you need to take a wooden or plastic pick and use it to clean the dirt in all corners thoroughly. Then clean the mesh with the help of a soft brush and do not apply too much pressure to it so that it does not crack. Do it slowly and thoroughly. Get this dust out. Clean the microphone hole thoroughly with a dry brush and do not push it too deeply. Now you have to apply a little alcohol on your brush. Place the earbuds in such a way that the mesh side is slightly lower and the other side is slightly higher so that alcohol does not enter the speaker or its internal parts. In this way, move the brush over it again and clean it. Then wash the brush thoroughly and clean the earbuds thoroughly with a dry cloth. Now, apply alcohol to a cloth and clean all the earbuds thoroughly. Apply a little alcohol so that it remains on the cloth and does not enter the holes of the earbuds. Clean the charging pins of the earbuds and charging case thoroughly and check that the pins of the charging case are not bent. If they become bent, they lose their flexibility, and this can cause charging problems. If they become crooked, straighten them with the help of tweezers and restore their flexibility. Thoroughly clean the carbon and dirt in the charging port Because carbon can cause slow charging problems Reattach the silicone tips of the earbuds and check it,
If the problem still persists, you need to remove the silicone tip again and remove the mesh from the earbud. Then wash the mesh with soapy water and make sure all the holes are fully opened. Use Double-sided very thin adhesive tape (if it fits) to reattach the mesh or use Very light amount of B-7000 or T-7000 adhesive Very small amount of E6000 Apply it in a very small amount only to the area that is sticky. Leave it for a while so that it dries well and then reattach the silicone tip and use it.
Precautions
- Do not use a needle or any sharp metal object, as this may damage the microphone speaker or grille.
- Do not apply any type of liquid directly.
- Avoid using thinner.
How to Clean Headphones
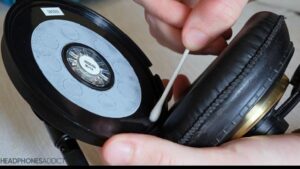
First you have to turn off headphones and remove the pads on the front of the speaker. Clean the microphone hole and other parts of the headphones thoroughly with a soft brush. First read your user manual and understand well whether your headphones are waterproof or not. If not, you can only clean them with the help of a dry brush. They used light-type fabric and foam, which starts to deteriorate when applied to water. And if they are waterproof and the foam and fabric on them are of good quality, you can wash and clean their pads using the following methods:
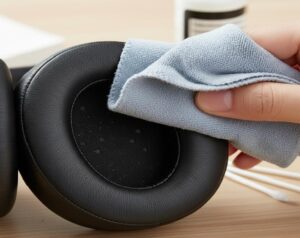
Pour one liter of water into a container. Put both pads in this water and let them stay in it for about three to four minutes. Then clean them with a soft brush and keep immersing them in water again and again while cleaning so that the dirt that comes out keeps coming off them. After cleaning them thoroughly, set them aside to dry. Now it’s time to clean the head pad, which is unremovable. You have to carefully immerse this headphone pad in water, making sure that both the speaker and the mic remain outside. Only the pad and the plastic material should be in the water, and no water should be allowed to get on the other parts. Take it out in the same condition, clean it with a brush, and dip it in water again in the same way. Clean it thoroughly in the same way, and squeeze the pad and clean it with a dry cloth. Then let it dry, and when all the pads are dry, you can reattach them and use them.
About the Author – Muhammad Shahid Akhtar
Muhammad Shahid Akhtar is a shop owner with 10+ years of experience in mobile accessories and audio products since 2010.
He completed his technical education from SMZ Institute and specializes in testing earbuds, headphones, and mobile devices.
All reviews are based on real-world testing and market experience.